


Zopa Clothing
Posted on November 18, 2023 - 7 minutes of reading
An e-commerce SPA store made with Typescript and React, manages state with Redux, consumes its products from a Node.js Rest API with MongoDB as a database, stores images on AWS S3 and payments with Stripe.
Index
1 Intro
Zopa Clothing is a friend's brand, and I embarked on this project to delve into advanced concepts in React and Typescript in the frontend as well as a Backend and CI/CD with Node.js with Typescript, Express.js, MongoDB and some AWS services like Beanstalk, Codepipeline, S3, among others.
Here are the key links:
Site:
https://www.zopaclothing.shop/
Source code:
https://github.com/guisalmeida/zopa-store
https://github.com/guisalmeida/zopa-store-api
2. Frontend
Crafted with Vite, React, and Typescript, our frontend is a testament to thoughtful implementation.
2.1 State Management
This was one of the most challenging parts of this project, I managed to implement Redux with Sagas which is a library to work with asynchronous state and prevents side effects.
2.1.1 Asynchronous state with Sagas
Implementing Redux with Sagas for asynchronous state and side effect prevention was challenging but rewarding. Sagas ensures our state stays in sync with asynchronous requests.
The generator functions are used as the base of the saga functions.
Here is an implementation of a saga function that fetches a list of products when the FETCH_PRODUCTS_START action is called.
import { takeLatest, all, call, put } from 'typed-redux-saga'
import { FirebaseError } from 'firebase/app'

import { getProductsCollection } from '../../utils/firebase'
import {
  fetchProductsSuccess,
  fetchProductsFailed,
} from '../actions/productsActions'

export function* fetchProductsAsync() {
  try {
    const products = yield* call(getProductsCollection)
    yield* put(fetchProductsSuccess(products))
  } catch (error) {
    yield* put(fetchProductsFailed(error as FirebaseError))
  }
}

export function* onFetchProducts() {
  yield* takeLatest('FETCH_PRODUCTS_START', fetchProductsAsync)
}

export function* productsSaga() {
  yield* all([call(onFetchProducts)])
}-
takeLatestis used to listen for a Redux action, and when that action is dispatched, it automatically cancels any previous instances of the same saga that might still be running and starts a new one. It ensures that only the latest instance of the saga is active, which can be useful in scenarios where you want to handle only the most recent occurrence of a specific action. -
callis used to call a function (usually a function that returns a Promise) synchronously inside a saga. It allows for better testing and handling of asynchronous code by providing a more natural way to invoke functions that return promises. It can also be used to call other sagas, making it a versatile tool for managing asynchronous flow. -
putis used to dispatch a Redux action from within a saga. When a saga needs to trigger a change in the application state, it usesputto dispatch an action. This action is then processed by the Redux store, updating the state accordingly. -
allis used to run multiple sagas concurrently. It takes an array of sagas as arguments and runs them in parallel. It is often used in scenarios where multiple asynchronous tasks need to be performed simultaneously. Theallfunction resolves when all the sagas in the array have been completed.
2.1.2 Memoization
Memorization is a specific form of caching that involves saving the return value at the first request, after that we can leverage the cached value if the subsequent requests are for the same value. We are using the Reselect library for creating memoized "selector" functions, commonly used with Redux. This helps us to prevent unnecessary calls to our backend for example if the state is still the same.
import { createSelector } from 'reselect'
import { TProductsState } from '../reducers/productsReducer'
import { TRootState } from '../store'

const selectProductsReducer = (state: TRootState): TProductsState =>
  state.products

export const selectAllProducts = createSelector(
  [selectProductsReducer],
  products => products.allProducts,
)

export const selectIsLoading = createSelector(
  [selectProductsReducer],
  products => products.isLoading,
)
2.1.3 Persisting local store data
To have the state persisted in local storage I used the library Redux Persist. This helps us to keep the cart data even if the user closes the browser.
This is set up in our store.ts config and passed as a provider in our main.tsx.
Following is a basic configuration:
// store.js
import { createStore } from 'redux'
import { persistStore, persistReducer } from 'redux-persist'
import storage from 'redux-persist/lib/storage' // defaults to localStorage for web
import rootReducer from './reducers'

const persistConfig = {
  key: 'root',
  storage,
}

const persistedReducer = persistReducer(persistConfig, rootReducer)

export default () => {
  let store = createStore(persistedReducer)
  let persistor = persistStore(store)
  return { store, persistor }
}
// App.js
import { PersistGate } from 'redux-persist/integration/react'
// ... normal setup, create store and persistor, import components etc.
const App = () => {
return (
<Provider store={store}>
<PersistGate persistor={persistor}>
<RootComponent />
</PersistGate>
</Provider>
);
};2.2 User Experience
A seamless user experience is crucial for conversions. Here are some key features that enhance user interaction.
2.2.1 Toast messages
Toast messages are used to notify users of important information using a modal message box. These notification messages pop up in the top-center of the screen but do not require the user to dismiss them, enhancing user feedback during actions like payments.

2.2.2 Stripe
Implementing Stripe for payments ensures a secure and smooth checkout experience. Our frontend integrates Stripe's UI components seamlessly.
To interact with the Stripe API, we needed to create a route /checkout/create-payment-intent in our backend to create a payment intent and this route gives us back a secret key that we can use in the frontend from to retrieve the rest of the user's data and send to Stripe API to validate the payment.
const getClientSecret = async () => {
  const response = await fetch(
    `${BASE_URL}/checkout/create-payment-intent`,
    {
      method: 'post',
      headers: {
        'Content-Type': 'application/json',
      },
      body: JSON.stringify({ amount }),
    }
  ).then((res) => res.json());

  setClientSecret(response.clientSecret);
};

getClientSecret();
In the frontend, Stripe UI components are imported to create a user-friendly payment form.
Here is an example of a code to create a payment form with Stripe.
...
import {
  PaymentElement,
  AddressElement,
} from '@stripe/react-stripe-js'

...

export default PaymentForm = () => {
  return (
    <>
    ...
      <AddressElement options={{ mode: 'shipping', allowedCountries: ['BR'] }} />

      <PaymentElement id="payment-element" options={{ layout: 'tabs' }} />
    ...
    </>
  )
}
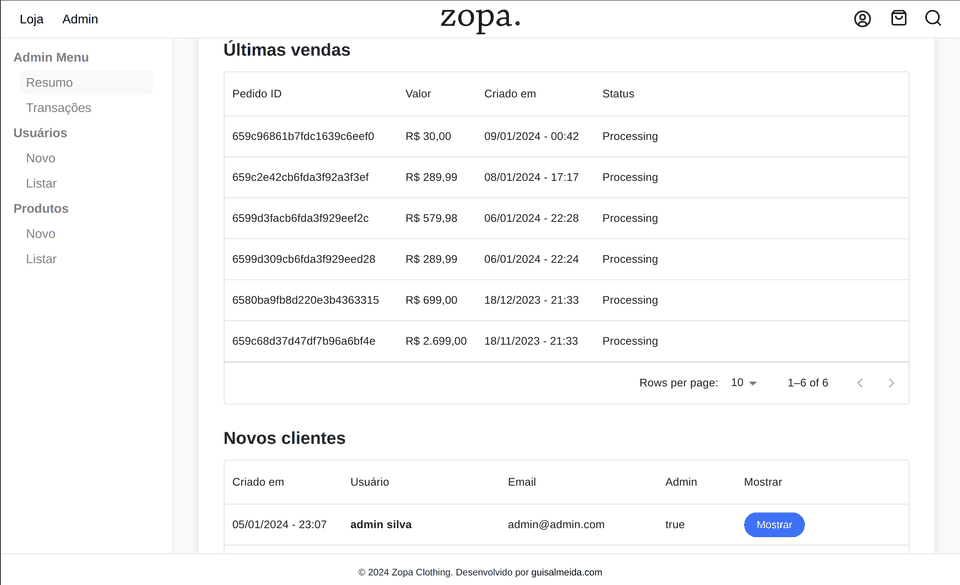
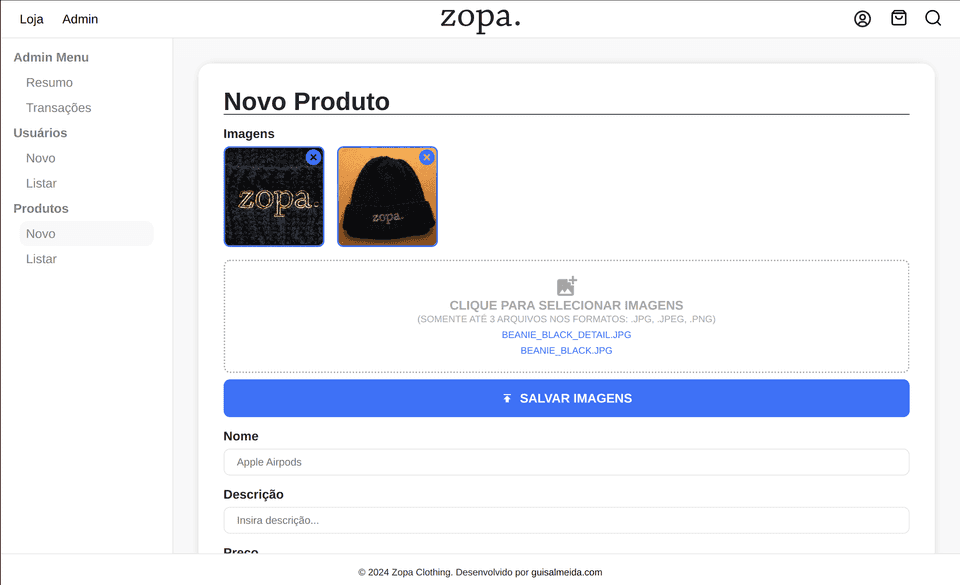
2.2.3 Admin CMS dashboard
As this project aims to be a store with products and users, it was necessary to create a CMS admin dashboard with some features to deal with the CRUD operations available from the API.
The chart was made using the Recharts library.
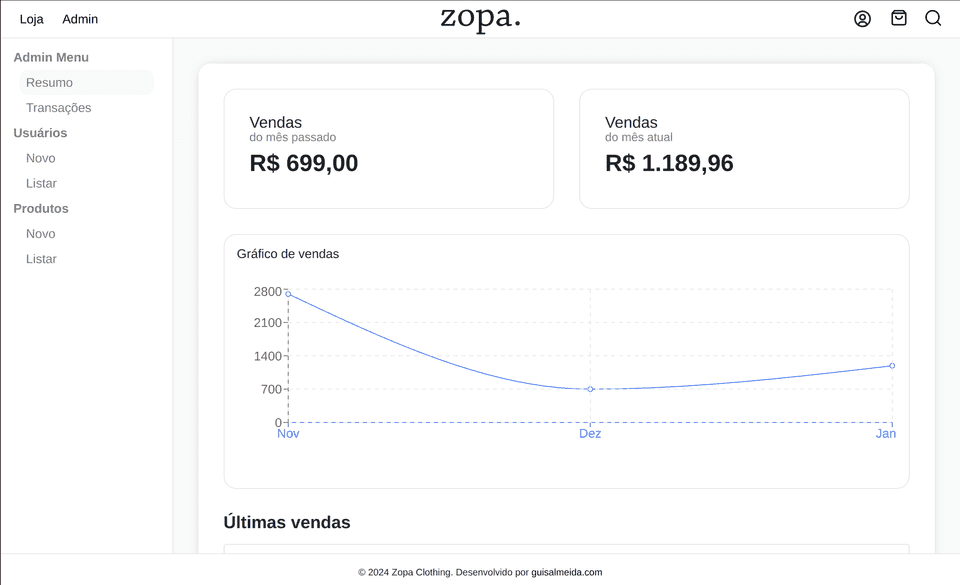
Also, the lists of products and users were made with MUI data grid.
Another important feature is when the admin registers a new product, its images are sent to a bucket on AWS S3, through an endpoint available from the API where it gives us back the image link which we can see rendered in the dashboard and also the links are sent with the rest of the product data to the MongoDB database.
3 Backend
The backend of this application is made with Node.js with Typescript, Express.js and Mongodb as a database and storing images on AWS S3. It's organized in a simple three-layer architecture.
3.1 Authentication
An important feature that enables our routes to be more secure and private. In our application, we are leveraging a middleware created to deal with the authentication of the user checking whether the user is authenticated and has the permissions to make the request or not. This is made through a token passed by headers in the request.
export default async function authenticate(
  req: Request,
  res: Response,
  next: NextFunction
) {
  const authHeader = req.headers.authorization;
  if (!authHeader) {
    return next(
      res.status(401).json({
        error: true,
        message: "Token não encontrado na requisição.",
      })
    );
  }

  //...

  return next();
}
3.1.1 JWT (Json Web Token)
The token passed through headers in the request is checked by a hash algorithm from the JWT library that responds if the token corresponds to the user and gives us back the parameters decoded as params, such as isAdmin.
export function verifyToken(token: string): TokenPayloadParamsType & Error {
  return jwt.verify(
    token,
    process.env.JWT_SECRET,
    (err: Error, params: TokenPayloadParamsType) => {
      if (err) return err;

      return params;
    }
  );
}
3.2 Upload Images to S3
Using AWS S3 combined with the Express libraries Multer and Multer-S3, I managed to implement a route where the client can request to send image files and get back the link of the images. This is made with a middleware where I need to pass all the data related to the AWS and the bucket that is going to be stored.
//...
export const s3Client = new S3Client(s3Config);

export const uploadMiddleware = multer({
  storage: multerS3({
    s3: s3Client,
    bucket: BUCKET_NAME as string,
    contentType: multerS3.AUTO_CONTENT_TYPE,
    key: (req, file, callback) => {
      callback(null, `images/${file.originalname}`);
    },
  }),
});
3.2 Persisting and retrieving data on MongoDB
In the MongoDB database, we store all the data related to the application, like products, users and orders. Using the Mongoose library we can connect with the database and persist this data through the models created. Also, we created some queries to retrieve rich data from sales to show on the chart, like the getIncome function that gives us a list grouped by month with the total sales.
export async function getIncome(req: Request, res: Response) {
const date = new Date();
const lastMonth = new Date(date.setMonth(date.getMonth() - 1));
const previousMonth = new Date(date.setMonth(lastMonth.getMonth() - 1));
try {
const income = await OrderModel.aggregate([
{ $match: { createdAt: { $gte: previousMonth } } },
{
$project: {
createdAt: 1,
month: { $month: "$createdAt" },
sales: "$amount",
},
},
{
$group: {
_id: "$month",
total: { $sum: "$sales" },
createdAt: { $first: "$createdAt" },
},
},
{ $sort: { createdAt: 1 } },
]);
res.status(200).json(income);
} catch (error) {
res.status(500).json(error as Error);
}
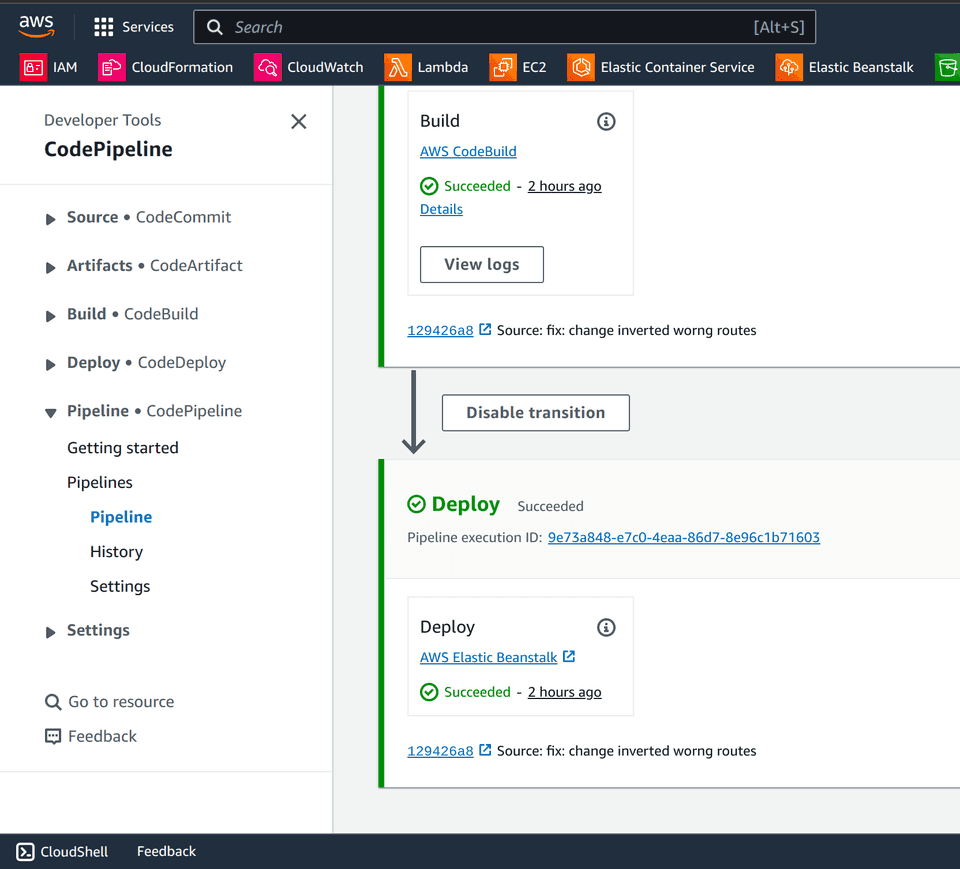
}3.3 CI/CD with AWS
The backend of the application is hosted on AWS, leveraging the services Elastic Beanstalk and Cloudfront. Which gives us more availability and the possibility to scale if needed. Also, we are using the Codepipeline service with Codebuild to deploy the application automatically when it has a change in the codebase leveraging the connectivity with the GitHub repo.
4 Conclusion
Zopa Clothing Store served as a playground for advanced React and Typescript concepts and effective state management using Redux and Sagas. Also, I could learn and put into practice some Restful API practices which gave me more confidence and knowledge to deal with requests and to persist data. Finally, I used AWS also to host and deploy the backend application which gave me a better understanding of the services like Elastic Beanstalk and AWS Codepipeline among others.
What are your thoughts on this project? Any suggestions or critiques? Feel free to leave a reaction or a comment below. Thank you for visiting! 😉